Walk into any new BTO or condo in Singapore, and you’ll quickly notice a common design challenge: space is at a premium. With studios and one-bedders averaging just 450–600 square feet, every wall, corner, and surface must earn its keep. Yet a carefully placed canvas print can do more than fill a bare wall—it can create depth, start a conversation, and make a small apartment feel intentionally designed, not cramped.
This guide covers practical strategies for using photo canvas arrangements in compact Singapore homes. We’ll look at sizing, layout, colour, and installation—without hype, just useful advice you can apply this weekend.
Challenges in Decorating Small Studio Apartments
Before picking a canvas, it helps to understand why small spaces feel tricky to decorate:
- Limited wall area – A single feature wall may be only 2–3 metres wide, shared with windows, doors, and air-con units.
- Multi-functional rooms – Your living area might double as a dining room and home office. Art needs to work from multiple angles.
- Humidity and sunlight – Singapore’s tropical climate means high moisture and strong UV can warp prints or fade colours over time.
- Rental restrictions – Many tenants cannot drill large holes, so peel-and-stick or light-weight hanging solutions become necessary.
None of these are deal-breakers. They simply mean you need to plan a bit more carefully than you would in a spacious landed property.
Selecting the Right Photo Canvas Sizes
Size is the single most impactful choice in photo canvas arrangements. Too small, and the art gets lost; too big, and it overwhelms the room.
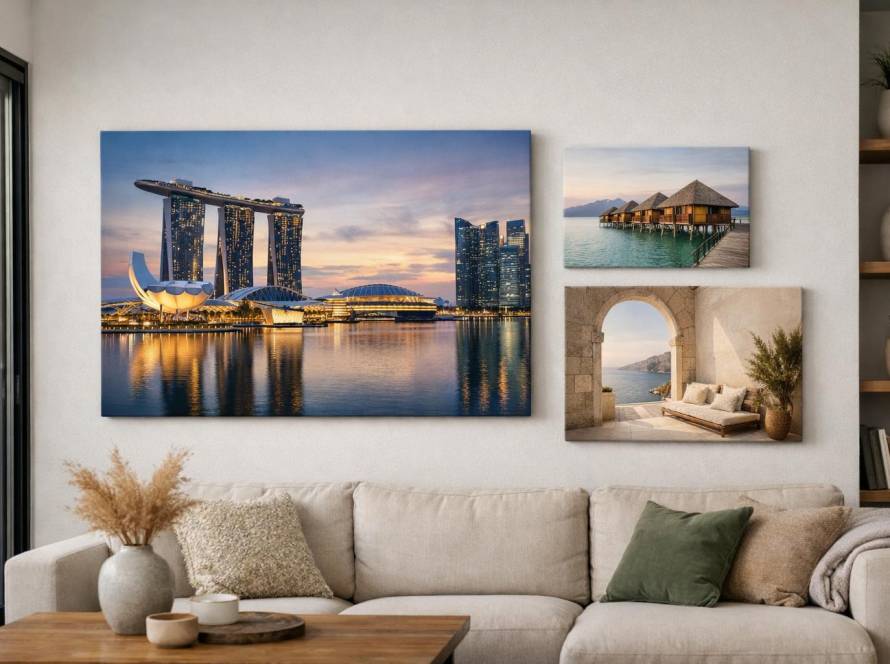
Single Canvas for a Focus Wall
For a wall that is 2–2.5 metres wide (common in HDB living rooms), a single canvas at 60×90 cm or 80×100 cm works well. It should occupy roughly two-thirds of the furniture width below it. For example, above a 1.5-metre sofa, look at a 80×100 cm canvas. For a 1.2-metre console table, 60×90 cm is more balanced.
Multi-Panel Canvases (Triptych or Diptych)
A three-panel set (e.g., 3× 40×60 cm) can fill a wall without making one print feel too heavy. The gap between panels should be tight—5 to 8 cm—so the eye reads the set as one image. Avoid large gaps, which can make the arrangement feel disjointed in a small space.
Mini Canvases in a Grid
For tight walls (e.g., beside a door or above a desk), consider 20×20 cm or 25×25 cm squares in a 2×2 or 3×3 grid. This uses small footprints but creates a deliberate gallery feel.
Arrangement Ideas: Symmetry vs. Asymmetry
The arrangement pattern affects how the room feels. Here is how to choose between the two for photo canvas arrangements.
Symmetrical Layouts
Best for: Formal or minimalist decor, above sofas or beds.
A symmetrical arrangement—two identical-sized canvases side by side, or a central large canvas with two smaller ones on each side—creates calm and order. In a small space, symmetry helps the brain quickly process the layout, which can make a room feel more organised. Use matching frames (or no frames, as with gallery-wrap canvases) and keep the spacing exactly equal.
Asymmetrical Layouts
Best for: Eclectic or contemporary looks, narrow walls, corner displays.
Asymmetry works when you have one dominant photo (e.g., a 60×90 cm) offset by two smaller prints (e.g., 30×40 cm each) staggered vertically. This draws the eye around the wall, making the space feel larger than it is. A tip: balance visual weight, not size. A small, dark-image canvas can anchor a larger, light-image canvas on the opposite side.
Color Theory: Harmonizing with Studio Decor
Colour is where many Singapore homeowners overthink. The goal is not to match, but to harmonise.
- Neutral walls (white, beige, light grey) – Almost any photo works. For a calm space, choose photos with low saturation (soft pastels, monochrome). For a pop, pick one strong accent colour that already appears in your cushions or rug.
- Feature wall (dark blue, charcoal, green) – Use light-toned or high-contrast photos. A black-and-white photo on a navy wall looks striking without clashing.
- Open-concept studio – Your canvas arrangement can help define zones. Use warm-toned photos (yellow, orange, warm brown) over the dining area, and cooler tones (blue, green) over the sleeping or reading nook.
Sample quick rule: Take your sofa or rug colour and pick a photo where that colour appears in at least 20% of the image. This ties the art to the room without being matchy-matchy.
Case Studies: Successful Studio Transformations
Let’s look at three realistic examples based on common Singapore constraints.
Case 1: 450 sq ft BTO Studio in Punggol
Problem: A long, narrow living area with one large wall (2.1 m wide) behind a small sofa. Renter, so no drilling allowed.
Solution: One 80×100 cm canvas printed with a black-and-white architectural shot (personal photo from a trip to Marina Bay Sands). Hung using 3M Command picture-hanging strips (rated for 3.6 kg). The monochrome palette matched the white walls and grey sofa, while the deep blacks added contrast.
Result: The large size made the wall feel less empty without needing multiple pieces. The renter took it down easily when moving out.
Case 2: 600 sq ft Condo in Clementi
Problem: A combined living-dining zone with no clear separation. Owner wanted both areas to feel distinct but cohesive.
Solution: Two separate canvas arrangements. Above the dining table, a diptych (2× 40×60 cm) of botanical prints with green leaves, echoing a small potted plant on the table. Above the sofa, a single 60×90 cm canvas of a soft sunset from East Coast Park. The warm tones in the sunset tied into the wood dining table.
Result: The eye naturally moved from one zone to the other. Friends commented the studio felt larger because the art created visual “rooms”.
Case 3: 500 sq ft HDB Studio in Toa Payoh
Problem: Low ceiling (2.6 m) and a short wall (1.8 m) beside a window. Wanted a personal gallery feel.
Solution: A vertical arrangement of three 30×40 cm canvases stacked with 6 cm gaps. Each canvas was a different close-up from a trip to MacRitchie Reservoir – leaves, water texture, a bridge detail. Asymmetrical placement: the middle canvas was offset 10 cm to the left.
Result: The vertical stack drew the eye upward, making the ceiling feel slightly higher. The asymmetry added a modern, collected-over-time vibe.
Tools and Accessories for Easy Installation
You do not need a professional installer for photo canvas arrangements. Here are practical tools for Singapore homes:
- Command picture hangers – Reliable for canvases up to 80×100 cm. Avoid using strips on textured walls or rough plaster; test a small piece first.
- Laser level – A basic laser level (under $20 from hardware shops) saves time and prevents tilted rows. For multi-panel sets, mark the top edge of each canvas before hanging.
- Spirit level and pencil – The old-school method works too. Measure twice, hang once.
- Spacer blocks – Use pieces of cardboard cut to your desired gap width (e.g., 5 cm). Hold them between panels as you mark drill points.
- Desiccant packs – In high humidity, slip a small silica gel pack behind the canvas (between the frame and the wall). It helps prevent mould on the print surface. Replace every 6 months.
For rentals, always check your tenancy agreement. Many landlords allow small hooks (1–2 mm diameter) in plaster walls. If not, command strips are a reliable no-drill option for lightweight canvases.
Quick Reference: Sizing Guide for Small Studios
| Wall Width | Recommended Canvas Size | Example Setup |
|---|---|---|
| Up to 1.8 m | Single 60×90 cm or 3 mini squares (30×30 cm each) | Above a console table or desk |
| 1.8–2.5 m | Single 80×100 cm or diptych (2× 60×90 cm) | Above a sofa or bed |
| 2.5 m+ | Triptych (3× 60×90 cm) or a grid of 4 mini squares | Large wall in an open-concept studio |
Frequently Asked Questions
What is the best canvas size for a small HDB living room wall (about 2.2 m wide)?
A single canvas of 80×100 cm is a safe choice. It fills the wall without overwhelming it. If you prefer multiple pieces, a diptych of 60×90 cm each works well, with 5–7 cm gaps between them.
Can I hang canvas prints without drilling in a Singapore rental?
Yes. Command picture-hanging strips can hold canvases up to about 80×100 cm. Make sure the wall surface is clean and dry before applying. For larger canvases, use two sets of strips for extra support. Avoid textured or freshly painted walls without first testing a small area.
How do I protect canvas prints from Singapore’s humidity?
Use a desiccant pack behind the canvas (place it between the frame and wall). Avoid hanging canvases in bathrooms or directly beside air-con units that blow moisture. Dust gently with a soft, dry cloth once a month. Keep away from direct sunlight to prevent fading.
Should I use a frame or frameless gallery-wrap canvas?
Frameless gallery-wrap canvases (where the image wraps around the frame edges) are ideal for small spaces because they sit flush against the wall and do not add bulk. Frames can work if you want a more formal look, but they protrude further, which can be a problem in tight corridors or low-traffic areas.
How do I choose photos for a multi-canvas arrangement?
Pick images that share a common colour palette (e.g., all monochrome, all with blue undertones) or a common theme (e.g., all nature shots from the same trip). Avoid mixing very different colour temperatures (warm and cool) in the same set, as it can look disjointed in a small room.
Next Steps
If you are ready to bring your own photos to life, browse the Canvas Craft gallery for inspiration. You can also check the sizes and prices page to see what works for your wall dimensions. For personalised guidance on photo canvas arrangements, feel free to reach out via the Contact page.